Designers and local chefs share their tips for a perfect outdoor setup.
By Tanya A. Yacina
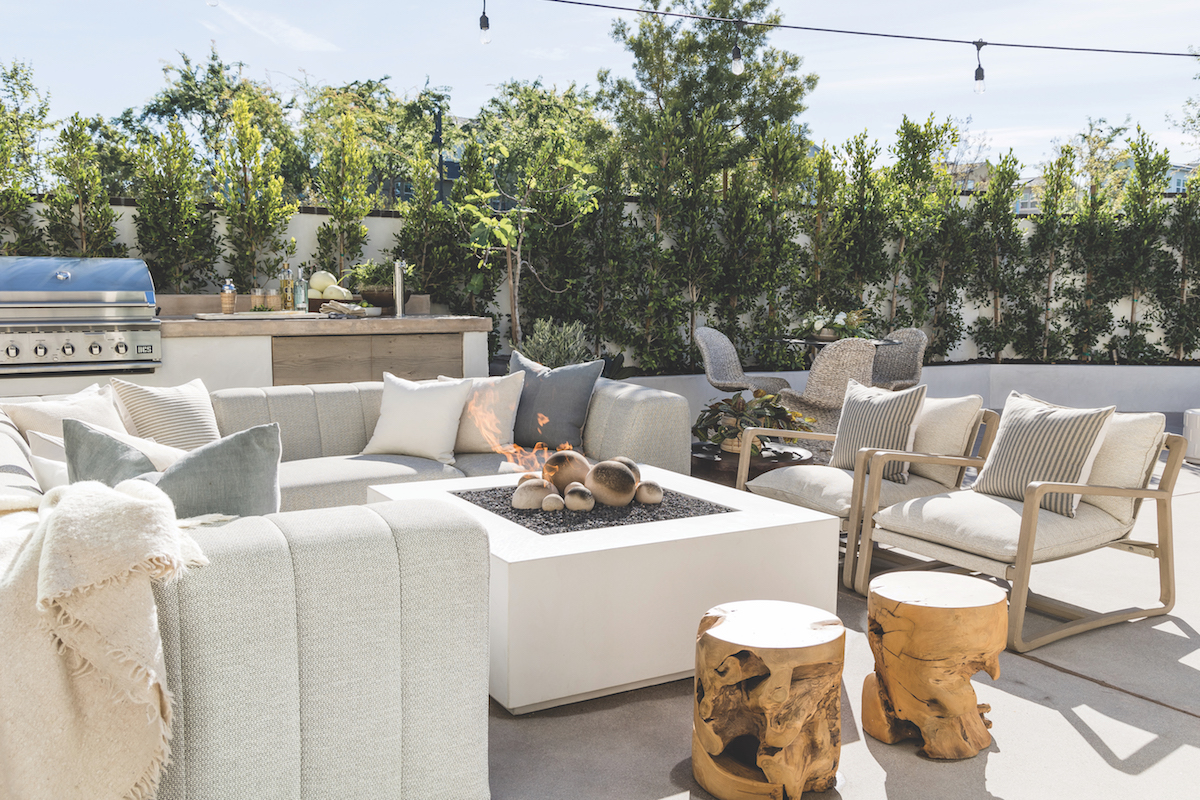
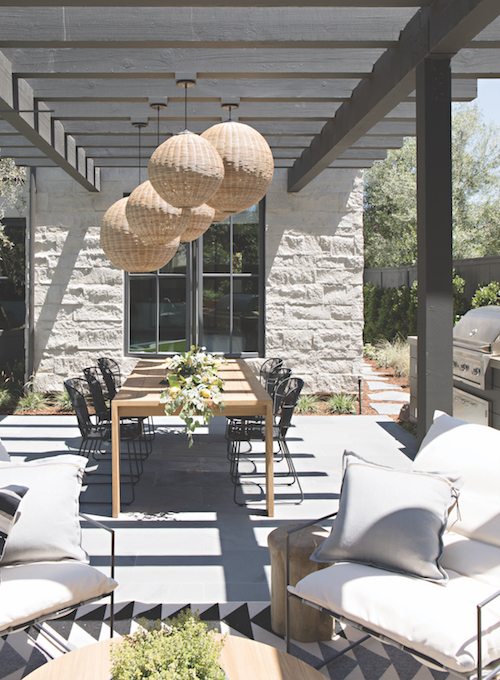
Creating the ideal space for grilling and entertaining outside involves thoughtful planning, design considerations and attention to detail. As the summer season kicks off, extending your living space outdoors provides a designated area for cooking, dining and relaxation, as well as a backdrop for years of memories.
“We are lucky in California to be able to have indoor and outdoor kitchens,” says Raili Clasen, owner of Raili CA Design. “I treat the outdoor spaces the same as indoor—pendant lights, stone counters and cool cabinets. If space allows, the more counter space, the better. You can use that [area] … for buffet-style dinners or set it up as a self-serve bar.”
Aly Morford, co-owner of Pure Salt Interiors, adds that outdoor kitchens “are a California staple,” so the goal is to “make them feel truly incorporated into the total living space.”
“Positioning your grill with functional counter space, cabinetry and other amenities—like a sink or wine fridge—makes for a high-functioning work zone that will encourage you to cook outdoors as often as you do in. Other ways to maximize your use and enjoyment of your outdoor grill is building out a larger living and lounge space—we call these California rooms—where you can get the best of indoor/outdoor living with all the creature comforts of your interiors.”
The Design
When setting up an outdoor kitchen, “a gas or wood-burning grill is the spectacle that most guests want to see,” says Adrian Bastida, kitchen manger at Bluewater Grill. “And we all know that if you are planning an outdoor kitchen party—or planning to build an outdoor kitchen for your home—you are doing it as much for your guests as you are for you,” he says. “An outdoor [space is the] … theater, and the stars of the show are the grill and the grill master.”
Bastida says if you are lucky enough to create an outdoor kitchen from scratch, he recommends including a counter where guests can watch the grill action with a cocktail and without worrying about the heat and smoke or being in the way of the grill master.
“A stocked refrigerator nearby is a grill master’s best friend,” adds John Ursini, owner of Newport Rib Co., noting that a cold beverage nearby means not having to leave the cooking station. “It allows the grill master to focus on what’s in front of him and also encourages guests to ‘visit,’ [grab a drink] and see what he/she is up to.”
Clasen also recommends adding an island to an outdoor grill area, complete with a countertop made of durable materials and some sort of shade.
“If room permits, it’s nice to have seating while the chef is at the grill,” she says. “[An] outdoor stone counter that doesn’t get too hot [and] stainless steel appliances [are ideal] to brave the outdoor elements. An overhanging cover is a game changer. It not only provides shade, but also provides structure for hanging lights.”
The Tools and Techniques
“Anything cooked outdoors is better—because you’re outdoors,” Ursini says. “Anything cooked on a grill is better because you see it, smell it and watch your meal come to life right in front of your eyes. You want to sit down and really enjoy big pieces of grilled meats and sides. Corn, asparagus, all kinds of colorful vegetables are perfect off the grill.”
Ursini notes that a meat thermometer and top-quality protein are also key. “[Grilling] starts with a good piece of meat—very few great meals start with inferior meat,” he says.
Ursini says his favorite grilling technique is searing the meat first, usually for one to three minutes, then lowering the temperature for slow cooking. He also cautions to not overcook meats—you can always throw things back on the grill, but you can’t uncook overcooked meat.
Bastida notes that it’s important to know when to use direct heat and when to opt for indirect heat.
“Direct heat is great for foods that cook quickly, like thin steak, fish or burgers, while indirect heat is better for slower cooking, thicker cuts of meats, fish or delicate foods,” Bastida explains. “Resist the urge to constantly flip your food. Let it cook on one side until it develops grill marks and releases easily from the grate, then flip it once to cook the other side.”

Ursini says everyone prefers their meat cooked in a slightly different way. “Know your audience when cooking and, if in doubt, medium-rare always works,” he says. “Vegetables—don’t overcook. Al dente works just fine with a little olive oil; let the veggies simply be veggies.”
Bastida says grilling fish can be a bit tricky, but, with the right techniques and products, you can achieve perfectly cooked and delicious results. He says to opt for fresh, firm-fleshed fish like swordfish, salmon, tuna or sea bass because these types of fish hold up well on the grill without falling apart. Preheat the grill to medium to high heat (about 380 to 400 degrees) and scrub the grates well.
To prevent sticking, Bastida says to lightly oil then season both sides of the fish—you can use canola oil, vegetable oil or any other type of oil with a high smoke point. If the fish has skin, start with that side down; this will get the skin crispy and also protect the flesh from direct heat. Cook, undisturbed, until grill marks develop and it easily releases from the grill grates. He advises that this usually takes three to five minutes per side, depending on the thickness of the fish.
When it comes to essential tools, Bastida says, “no outdoor grill is complete without a good pair of long-handled tongs.”
“They’re indispensable for flipping food on the grill, rearranging charcoal or wood chips, and even adjusting the position of the grates if your grill allows it,” he says. “They keep your hands safe from the high heat and give you precise control over your grilling process.
“[Another] … must-have is a well-oiled, small hand towel that you may have to discard after a few sessions of grilling. You can use your long-handled tongs to grip the oiled towel to clean and marinate the grill before, after and during your grilling session. This will help to ensure beautiful grill marks and assist with anything sticking to hot grill grates.”
For fish, a spatula is a helpful tool. “Use a spatula when it comes time to carefully flip the fish,” Bastida says. “Then, use a thermometer to ensure the internal temp [is] 145 degrees. Pull from the grill [and] let fish rest for about three minutes.”
Whether grilling, fish, meat or veggies—or even making a pizza over the open fire—summer is a great time to gather with friends and family to enjoy some dishes cooked in the great outdoors.
Grilled Artichoke
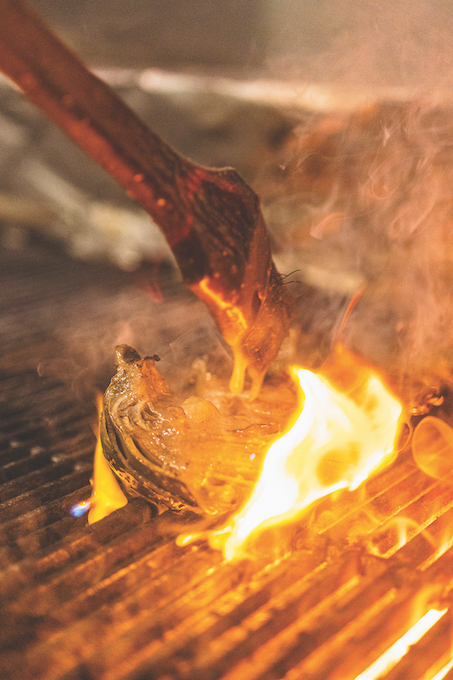
Two artichokes, quartered
Italian dressing, for basting
Butter, mayonnaise or hollandaise sauce, based on preference, for dipping
Cut two fresh artichokes into quarters and steam for 45 minutes. Then, place in ice water to cool for 15 minutes. Clean out the hearts and refrigerate the artichokes overnight. Next day, put them on a hot grill and baste with Italian dressing (get inside as much of the leaves as possible). Grill the first side for 5 minutes, turn them over and grill for 3 minutes on the other side. Serve with melted butter, mayonnaise or your favorite hollandaise sauce.
—Courtesy of Newport Rib Co.
Bluewater Grilled Chipotle Swordfish with Corn & Avocado Relish
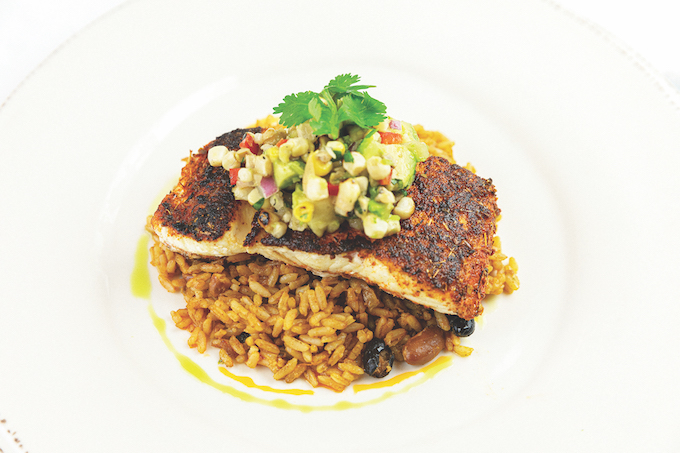
Swordfish
Four 8-ounce swordfish fillets
Olive oil
1½ teaspoons paprika
1 teaspoon garlic powder
1 teaspoon chipotle chile pepper
1 teaspoon onion powder
1 teaspoon dried thyme
¼ teaspoon black pepper
¼ teaspoon cayenne pepper
¼ teaspoon dried basil
¼ teaspoon dried oregano
¼ teaspoon salt
In a medium bowl, combine paprika, garlic powder, chipotle chile powder, onion powder, thyme, black pepper, cayenne pepper, dried basil, dried oregano and salt, then set aside. Lightly brush or spray each side of the fish with olive oil. Dip each side of the fish in the spice mixture until both sides are fully coated. Grill the swordfish on an open grill, about 2-3 minutes per side. If your grill has wide spaces between the metal grates, use a fine-mesh grill basket that will hold and cook the fish above the grate without sacrificing the grilled taste. This makes it easier to move and flip the fish to ensure a uniform consistency. Once cooked, remove fish from the heat and let rest for a few minutes. Transfer fish to a preheated oven and cook for an additional 6-10 minutes. Carefully plate swordfish and top with roasted corn and avocado relish (recipe below).
Relish
3 white or yellow corn cobs, shucked and roasted
1 jalapeno, roasted, minced and seeded
1 ripe avocado, finely diced
½ red onion, finely diced
1 ounce minced garlic
2 ounces olive oil
1 ounce red wine vinegar
½ bunch cilantro
1 teaspoon kosher salt
Shuck corn husk and roast on grill, let cool. Place jalapeno on grill until skin is charred, let cool. Cut corn off cob, then peel and remove seeds from jalapeno, and dice. Mix all ingredients together in a bowl. Taste and adjust seasoning to preference. Store covered in refrigerator.
—Courtesy of Bluewater Grill


